DevOps part 5, Reflection

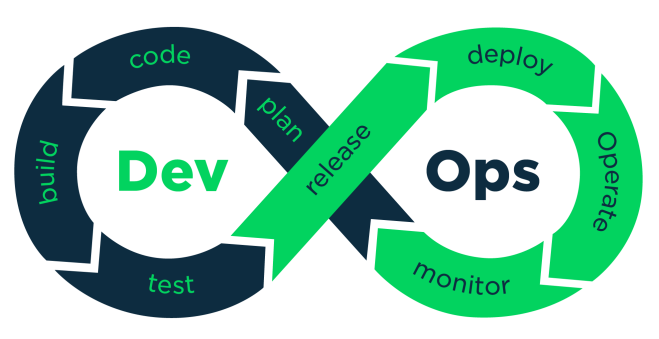
For me, DevOps was just a concept. I thought that it was just a title for a developer, but it’s not just that. This research helped me to understand what really DevOps is. Not just the understanding of the concept, but also it helped me to understand how does it works thanks to all the activities that we did on each part. Some of the activities were long and sometimes tedious, but they were accurate to the topic. 

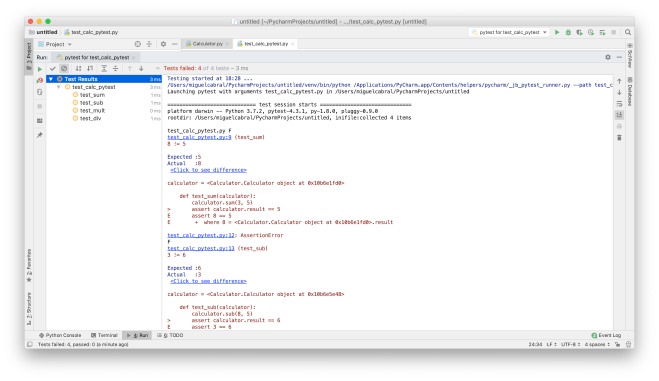
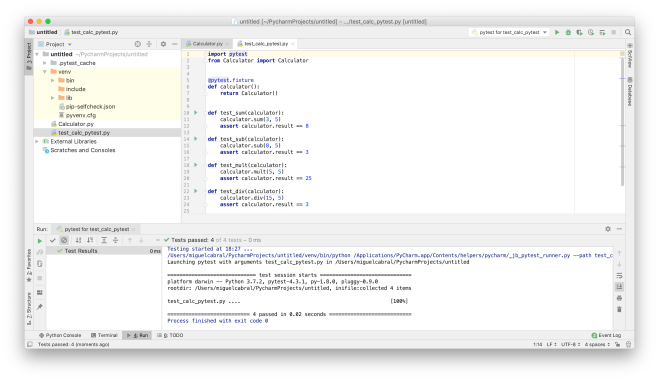
I searched tools that can be used to implement DevOps and with a quick search I found  this link: https://raygun.com/blog/best-devops-tools/. In this link we can find the top 10 tools for DevOps. I just know two of them from those 10, Git and Docker. In my opinion, I didn’t like Docker when I used it because it was a little bit difficult to implement, but I do like Git. Git has a lot of advantages and some disadvantages.

Advantages:

  1. It’s a distributed model
  2. Branching and merging is easy
  3. Flexible workflow
  4. Assured data integrity

Disadvantages

  1. Steep learning curve
  2. Slow for binary files (non-text files)
1*QoR3rxWIbnf5wmF_IuAHqQ
Image taken from: https://cdn-images-1.medium.com/max/1600/1*QoR3rxWIbnf5wmF_IuAHqQ.png

These tools can be very helpful for the development of a project. There are so many tools for DevOps but it might take a while to know which one fits better for the team. It can take also time to configure and implement it into the project, but at the end these tools may boost the development of the project.

All of these exercise tasks during the semester are better than just writing a blogpost about a topic. Exercises help us to understand better the concepts because we need to work more in order to do them. We need to research about the topics in order to be able to apply them in the activity. So, if we research about it and then we apply it into an activity, we can gain more knowledge at the end.

Python Testing

‘Simple Smalltalk Testing: With Patterns’ by Kent Beck is a great column. It can help you to understand the basic principles of testing, this reading explains a simple testing strategy proposed by the author and a framework used to support this strategy. In my opinion, I liked the examples that are show in the column, they are easy to understand and clear. Here is my screenshot regarding my question in the reading. 

Screen Shot 2019-03-21 at 7.50.52 PM.png

The provided link of the column is from the WayBackMachine site. This site was created to save digital artifacts for people in order to be used by historians or people interested in old websites and its content. Also, it can be used just for entertainment. People can use this site to see how the actual important sites look like. Apple is known for its modern design in technology. Nowadays, Apple’s website is amazing and beautiful, I can’t believe the appearance of its website on 1997. Here is a picture of it:

Screen Shot 2019-03-22 at 1.03.24 PM.png

I have seen unit testing a lot in this semester, specially in Software Quality and Testing class. Before this semester, my way to test my code was really different compared to te new practices that I’m learning. The video ‘Unit Testing and Test Driven Development in Python’ has important material. In my opinion it has a clear way to explain how does unit testing works, specially in Python. The examples are concrete and easy to understand and I think that that’s important to get a better understanding of the theme. On the other side, I think that the video is slow. I understand that the video needs to be long enough to cover all the aspects of unit testing and TDD, but it’s kind of difficult to follow for a long time. I recommend it anyways, it is possible to see the whole video by parts without losing the complete idea of it.

Finally, I’ll like to share some screenshots of my unit tests using PyCharm. I find PyCharm really easy to use. I just needed to follow 3 steps to complete the setup in order to be able to use unit tests. You just need to:

Enable Pytest for you project

  1. Open the Settings/Preferences | Tools | Python Integrated Tools settings dialog.
  2. In the Default test runner field select pytest. 
  3. Click OK to save the settings.

For my test, I created two python files, my class Calculator with 4 basic operations (sum, subtraction, multiplication or product, and division), and the other one is my test file. PyCharm has an integrated tool to run tests. Aside from the the functions that have the word ‘assett’, an arrow appears to run the test. I ran the tests with errors first to see the results. The first screenshot is my code, the second one has the results.

Screen Shot 2019-03-22 at 6.29.18 PM.png

Screen Shot 2019-03-22 at 6.29.04 PM.png

I like how the errors are displayed with Expected and Actual. It’s easier to see the mistakes in that way. At the end, I ran my tests correctly and this was the output. Screen Shot 2019-03-22 at 6.27.48 PM.png

DevOps part 3

In this blog post, I’ll show you how to configure our Github account with two-factor authentication, we’ll clone a repository in our virtual machine (the one that we downloaded in the previous post “DevOps part 2”) using SSH, we’ll try to commit new changes using SSH, and we’ll try to automate these updates using Crontab.

First, we are going to activate 2FA (two-factor authentication) on GitHub, it’s really simple. We need to login in our account in order to follow the next steps:

  1. Click the settings icon located in the top right corner.
  2. Click ‘Security’ in the in the user settings sidebar.
  3. Click ’Setup two-factor authentication’.
  4. Select ‘Setup using SMS’ and add your phone number.
  5. You’ll receive an activation code, type in in the field and click on ‘Enable’.

Once we activate 2FA, we can proceed with the connection of GitHub with SSH. For this, we need to check if we have existing SSH keys. If we don’t have a SSH key, we need to generate one. Generating a SSH key can be a little tricky, here’s a tutorial provided by GitHub that shows you how to generate a SSH key: https://help.github.com/en/articles/generating-a-new-ssh-key-and-adding-it-to-the-ssh-agent. Once we have our key, we need to add it to our GitHub account. To activate the key, we need to follow these steps:

  1. Click on your profile photo, then click on ‘Settings’.
  2. In the user settings sidebar, click SSH and GPG keys.
  3. Click New SSH key or Add SSH key.
  4. Add a descriptive title and paste the SSH key.
  5. Click Add SSH key and confirm the action entering your password.

We can find some steps to connect Github with SSH in this link: https://help.github.com/en/articles/connecting-to-github-with-ssh.

Now it’s time to clone. I have a web repository, but it’s private. I’ll try to explain the steps that I followed to achieve a live web site at the moment of the updates. That is, to see the changes automatically when we push a new update.

I followed this tutorial, I think that it explains the way we should do it better: https://gist.github.com/Nilpo/8ed5e44be00d6cf21f22. In my opinion, it’s too complicated to configure a GitHub repository with SSH, but it’s really useful if we want to automate the live production of our site. Once we have finished the tutorial, we can test our changes. I tried to modify my webpage and the updates are being reflected in the moment.

In my opinion, it’s difficult to decide the time of our automations using Crontab because it all depends on how are we going to work on one specific project. I think that it’s uncertain how often we can update project with new features.

DevOps part 2, Linux Server Setup

For this post, I’ll be explaining how to install Ubuntu in a new virtual machine from MacOS, how to install a programming language support environment in the VM and a web development to run a server, and how to setup a test use of Cron on the server. For this, I’ll be following some tutorials. I’ll link them later.

First, we need to install Ubuntu. For this, I decided to use Parallels because it’s really easy to manage a new virtual machine. We just need to download Parallels Desktop for Mac and open it. In the menu section, we need to select “Download Ubuntu Linux” and that’s it. Ubuntu will open when the download finishes. Once we download Ubuntu, drivers will be installed. We need to restart the VM before we start working on the following tasks.

Screen Shot 2019-03-19 at 10.23.19 PM.png

Once the VM has restarted, we can proceed to install our development environment. For this tutorial, I decided to create a virtual environment for python. If we run the command python -V, we can see that the default version is Python 2.7.12.We need to run the following commands to create an environment, then we’ll proceed to activate it.

apt-get update
apt-get install python-virtualenv
virtualenv -p /usr/bin/python3 virtualenvironment/PROJECT_NAME

Once these commands have finished to process, we need to activate our new environment. To do it, we need to run these commands:

cd virtualenvironment/PROJECT_NAME/bin

source activate

Now we are inside our new environment. Note, in order to get out of the environment, we just need to run

deactivate

The next step is to setup our web development. For this, I’ll be using LAMP. We just need to run:

sudo apt-get install lamp-server^

In order to test that LAMP is working, we just need to go to Firefox and open http://localhost. If the installation was correct, we are going to see a landing page like this one:

Screen Shot 2019-03-19 at 11.09.16 PM.png

If we want to add new stuff, We just need to add the new files to a folder. The folder is located in the files system, inside var/www/html/. There is a file named index.html, it’s the one that we are looking in the previous picture.

Finally, we can schedule tasks with the help of Crontab. With it, we can specify a command and it’ll be executed at the time it was assigned. For example, if we want to run an specific command every x minutes, we just need to open the crontab file with the command

crontab -e

Then, we need to select an editor, select anyone. Finally, we just need to add our instructions. To do it, we need to write the intervals to execute our command. The format to add one is “minute(0-59) hour(0-23) day(1-31) month(1-12) weekday(0-6) command”. So, if we want to run the command /usr/bin/example at 12:30 a.m. every day, we’ll type:

29 0 * * * /usr/bin/example

There are different ways to set a time, check the documentation first. It’s not that hard to set new tasks. Save the changes and your tasks will be activated.

A more descriptive tutorial can be found at https://www.howtogeek.com/101288/how-to-schedule-tasks-on-linux-an-introduction-to-crontab-files/

What is DevOps?

Software companies have more than one team to create their products. Those teams are divided into specific areas in order to have a better organization and to simplify the way to work together, but sometimes these divisions cause more problems at the end. It’s common to get in trouble while merging all the work at the end of each iteration or while pushing it to the deployment area. Sometimes, it’s because one team works with a different environment and the other teams with another. Maybe the communication between the temas is good, but it’s not necessarily sufficient to remove all possible compatibility problems. DevOps emerged in order to try to avoid these problems, or at least to reduce them. The following video explains in an easy way what DevOps is:


According to the video, DevOps is an integration between developers and operation teams in order to improve the collaboration and productivity. This goal is achieved by working together in all the lifecycle of the project, from the design process through the development process to the production delivery. With this practice, developers and operation teams (DevOps) can work together to automate workflows or to measure the application performance.

DevOps focus on automation. They can automate code for testing, workflows, or the infrastructure of the project. Also, the development of the project is divided in small pieces instead of having all the code or the complete feature. This practice is used because in this way it’s easier to fix bugs or to integrate the new implementation to all the work. This way of working makes a better communication between the operations and the developers. Both of them work with the same environment. DevOps is useful if we compare the speed of employment with the time it takes to deploy an implementation without DevOps. Usually, the frequency of deployments increase when DevOps is implemented in a company.

1*EBXc9eJ1YRFLtkNI_djaAw
Image taken from: https://medium.com/@neonrocket/devops-is-a-culture-not-a-role-be1bed149b0

In other words, DevOps can help the company reduce the time that it takes to deploy a new product, automate processes to analyse the performance of the software and its behavior, and to increase the productivity of the company. DevOps can be difficult to implement, a good communication in needed between the developers and the operation teams. Also, the right tools are important to put DevOps in practice. These tools help the whole team to implement DevOps in an easier way.

View at Medium.com

The Secret Life of Bugs

All developers have faced bugs while programming. It’s so common in the life of a developer that most of the time bugs aren’t even stressful for the developer because we are all expecting them to happen. There are many ways to solve bugs, or at least to try to solve them, but sometimes it’s needed a little help from others to discover the problem. People tend to inform about bugs so that developers can get to work and try to fix them. 

The paper “The Secret Life of Bugs: Going Past the Errors and Omissions in Software Repositories” shows us that having a good database with records of bugs is just not enough. All of the analysis that these researchers did, gave interesting results. I personally thought that automation regarding bug fixing in big companies was a thing, but it seems that it’s not that common, or at least it’s not the preferred way to solve bugs.

Documenting bugs is important in order to have a record of it for future research. Sincerely, I’m not into documenting bugs, but I think that I need to start doing it. Someday it’ll be useful for me or for someone else.

Here is the link for those who want to read the paper: https://plg.uwaterloo.ca/~migod/846/papers/aranda-secretLifeofBugs.pdf

Unit Tests

In this blog I’ll try to explain how to use the framework JUnit with eclipse in order to create and use unit tests. The following examples are going to be in my GitHub repository.

Link to the repo: https://github.com/MiguelCbrm/UnitTests

First, we need to create a new Maven project in Eclipse. Some Eclipse versions need to have downloaded a special package to use Maven. Once created the project, we need to download and the JUnit 5 jars. They can be found in this repo: https://github.com/noopur2507/eclipse-junit5.git. We need to go to Configure Build Path of the project, there we can add new jars to it. After that, we need to modify the pom file, we need to add new dependencies and properties in order to be able to use JUnit 5 framework.

The dependency is:

<dependency>
<groupId>org.junit.jupiter</groupId>
<artifactId>junit-jupiter-api</artifactId>
<version>5.1.0</version>
<scope>test</scope>
</dependency>

Also, we need to add these properties to the pom file:

<properties>
<maven.compiler.source>1.6</maven.compiler.source>
<maven.compiler.target>1.6</maven.compiler.target>
</properties>

Our project has two packages, “main” package and “test” package. We need to create one java class in the main package. This class is going to have the methods that we are going to evaluate in the Unit tests. For this example, I’m going to crate a simple operations class with sum, subtraction, product, and division.

Now, we are going to create a new JUnit Test Case in the “test” package. For this tutorial, it’s important to select “New JUnit Jupiter test” while creating the new file. In this new class, a method named Test is going to appear. Here we can add our tests. In my case, I want to compare the expected results with the current results of my operations. In order to compare these two results, we are going to use the assertEquals(x, y), in which x is our expected value, and y is our final result.

Screen Shot 2019-02-04 at 7.15.29 PM

Finally, we are going to run our code as a JUnit Test. For this, we are going to select our project, click in Run As, and select the JUnit Test option. If all of our expected results are correct, a green bar will be shown. In case we have mistake in our tests, the bar will be red. Screen Shot 2019-02-04 at 7.17.46 PM.png

With this, we can see if our expected results are passing the test or not. It’s not that hard to implement the JUnit framework and it’s really helpful if we want to test our methods.


Test && Commit || Revert

I have to agree with the idea that coding is one of the best ways to get better at it, not just by doing research and learning the theory. With the time, my skills improved because of all of the projects that I have made during my career. Practice is important to improve the programming skills. Kent Beck is still developing code and his skills are amazing according to his impact in the software society. His point of view about the DevOps is interesting and I think that he is right; if the DevOp is able to break some code, he or she is also able to rebuild it and find a solution to it.

In my opinion, the Test && commit || reverse concept is interesting. Personally, I don’t tend to commit my code unit I have implemented a lot of new features or functionalities to it, but I have to agree that when something goes wrong, I do have to make a lot of changes until I get the problem and sometimes it results in a mess. I’m not used to commit so frequently, but now I’m thinking that it’s better to commit my code every time I tested successfully a new feature. Maybe I’ll implement this concept in my future projects.

In the other hand, it is important to measure the impact of the commits in the project. Sometimes commits aren’t that important and small changes can lead to lose the point of using the commit tool. It also can depend on the size of the team or how often people interact with someone’s committed code.  I think that I’m more used to code in a TDD than the TCR, but I’ll try to change my way to code in order to see which one is better for me.

Kent’s principles seem to be obvious, but they are accurate. The first one says that everyone is responsible for their own learning. Every person has a different way to learn new things, but the important part is that people need to know which part of the new data or information is the important one and which one isn’t. With this, I understand that it doesn’t matter how you implement your coding skills, with the TDD method or with the TCR, but it does matter how are we taking advantage of the situation. 

An interesting podcast can be found at https://embed.simplecast.com/97f546d8, it’s an interview directed by Scott Hanselman with Kent Beck regarding test && commit || revert.

Also, here is a video explaining what is Test Driven Development. Kent Beck compares some of the main ideas of the TCR and TDD.